Fizzy Zhang

本文目录

  1. 1. 简介&核心概念
  2. 2. 编写应用
    1. 2.1 安装&初始化
    2. 2.2 主进程模板代码
    3. 2.3 渲染进程模板代码
    4. 2.4 Preload Script
    5. 2.5 进程间通信
    6. 2.6 “原生” API / UI 调用
    7. 2.7 本地 DB 能力-sqlite
    8. 2.8 日志管理
    9. 2.9 应用打包
    10. 2.10 应用发布与版本更新
  3. 3. 问题记录&说明
    1. 3.1 preload 注入的安全问题
  4. 4. 常见场景配置
    1. 4.1 mac 顶栏设置
    2. 4.2 mac dock 应用图标
    3. 4.3 设置应用程序图标

Electron 笔记

过去在工作中因需要,匆忙给政企部门封装过一个 Electron 客户端应用,整个过程非常“敏捷“,印象中有很多版本方面的差异和兼容问题,但没有总结,这里对着官网整个基础 mac 应用,学习整理下各方面功能实现及 API 调用。

官网:https://www.electronjs.org/

本文完成 DEMO : https://github.com/zzyxka/electron-demo-app

注:本文以 mac 平台为准,其他平台可能需要增加“补丁”类模板代码。
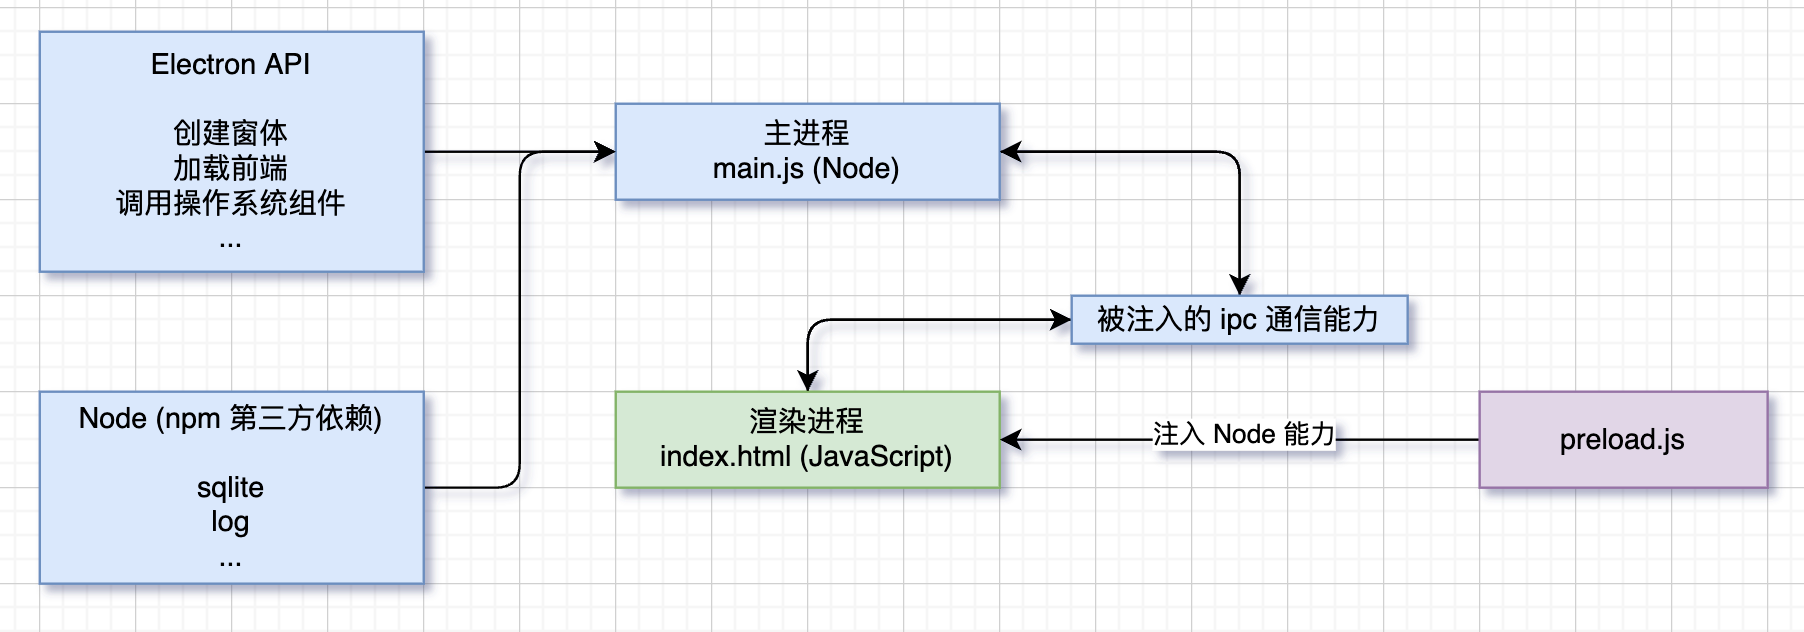
概述

1. 简介&核心概念

Electron 是能够使用 前端技术(HCJ) 开发 跨平台桌面APP开源 方案。

基于 Node.js 和 Chromium 内核,渲染一个 web 项目的桌面应用框架,同时具备 web 应用的渲染策略 和 Node.js 的后端能力,并提供了许多操作系统 API 以供使用,完成 web 应用做不到的操作系统/文件系统级别交互。

核心概念

  1. 主进程 - main process:简单理解为运行整个 APP 的 Node 进程
  2. 渲染进程 - renderer process:简单理解为被主进程加载的 前端 web 项目
  3. 特殊的 preload.js - preload script:渲染前,最后能够同时使用 node / window&document 的机制,可以理解为从 Node 环境下带一些初始化参数给渲染进程进行首次渲染
  4. 进程间通信 - ipc:主进程(Node) 无法直接访问 渲染进程(web),反之亦然,二者需要交互,就需要用到进程间 ipc 通信
  5. “原生” API:从 electron 包中导出的各类用于程序创建、窗体、消息推送等 API

2. 编写应用

2.1 安装&初始化

1
2
3
4
5
6
mkdir electron-app && cd electron-app
npm init -y
npm init @eslint/config # eslint 不解释
# node install.js RequestError: read ECONNRESET 解决方案
# npm config set electron_mirror "https://npm.taobao.org/mirrors/electron/"
npm install electron --save-dev

和常规 node 项目一样,npm 初始化,npm 安装 electron 包,国内可能遇到注释问题,按注释替换 electron_mirror 镜像解决。

1
2
3
4
5
6
{
"main": "main.js",
"scripts": {
"start": "electron ."
}
}

初始化:

  1. 和常规 node 项目一样,在 package.json scripts 中增加 start 启动本地调试
  2. package.json 中 main 作用为标识应用程序入口,在这里即 主进程 入口
  3. 创建 main.js 来编写主进程代码
  4. 创建 index.html 来作为视图/界面/渲染进程(当然可以是任何前端框架项目)
  5. 创建 preload.js 来完成渲染进程的初始化工作

2.2 主进程模板代码

编写主进程其实就是在编写 Node.js,需要关注:

  1. 加载渲染进程,即渲染视图页面/前端项目
  2. 不同操作系统的视图、表现、默认交互差异等,如:窗体关闭是否处于后台等不一致表现,需要在一些程序 生命周期 中,使用部分模板代码来处理
1
2
3
4
5
6
7
8
9
10
11
12
13
14
15
16
17
18
19
20
21
22
23
24
25
26
27
28
29
30
31
32
33
34
35
36
const { app, BrowserWindow } = require('electron')
const path = require('path')

const createWindow = () => {
const win = new BrowserWindow({
width: 800,
height: 600,
webPreferences: {
preload: path.join(__dirname, 'preload.js')
}
})

win.loadFile('index.html')
// win.loadURL('https://www.electronjs.org/')
}

/**
* You typically listen to Node.js events by using an emitter's .on function.
* like: app.on('ready', () => { ... })
* However, Electron exposes app.whenReady() as a helper specifically
* for the ready event to avoid subtle pitfalls with directly listening to that event in particular.
* See electron/electron#21972 for details.
*/
app.whenReady().then(() => {
createWindow()

// Open a window if none are open (macOS)
app.on('activate', () => {
if (BrowserWindow.getAllWindows().length === 0) createWindow()
})
})

// Quit the app when all windows are closed (Windows & Linux)
app.on('window-all-closed', () => {
if (process.platform !== 'darwin') app.quit()
})

2.3 渲染进程模板代码

编写渲染进程其实就是在编写前端,需要关注,怎么判断 web 处于 Electron 中

1
2
3
4
5
6
7
8
9
10
11
12
13
14
15
16
<!DOCTYPE html>
<html>

<head>
<meta charset="UTF-8">
<!-- https://developer.mozilla.org/en-US/docs/Web/HTTP/CSP -->
<meta http-equiv="Content-Security-Policy" content="default-src 'self'; script-src 'self'">
<title>Hello World!</title>
</head>

<body>
<h1>Hello World!</h1>
<script src="render.js"></script>
</body>

</html>
1
2
3
4
5
6
// render.js

// 由 preload.js 注入的 window.bridge 对象
if (window.bridge) {
console.log('versions: ', window.bridge.versions)
}

2.4 Preload Script

能够同时访问主进程和渲染进程的“初始化”位置,需要关注:

  1. 为渲染进程安全地注入部分 属性 和 Node 能力
  2. 为渲染进程开启与主进程通信的 ipcRenderer
1
2
3
4
5
6
7
8
9
10
11
12
13
14
15
16
17
18
19
20
const { contextBridge, ipcRenderer } = require('electron')

contextBridge.exposeInMainWorld('bridge', {
// 注入变量/函数到 window 对象中
versions: {
electron: process.versions.electron,
node: process.versions.node,
chrome: process.versions.chrome
},
// 为渲染进程注入与主进程 ipc 通信的函数
invoke: (channel, data) => {
switch (channel) {
case 'webLoaded':
return ipcRenderer.invoke(channel, data)
default:
console.error(`Unknown channel: ${channel}`)
return `Unknown channel: ${channel}`
}
}
})

2.5 进程间通信

利用 preload.js 中注入的 ipc 通信方法,进行主进程和渲染进程通信。

参考:

https://www.electronjs.org/docs/latest/api/ipc-main

https://www.electronjs.org/docs/latest/api/ipc-renderer

main.js

1
2
3
4
5
6
7
8
9
app.whenReady().then(() => {
ipcMain.handle('webLoaded', (event, args) => {
console.log(args) // print out { data: 'render success!' }
return { data: 'success' }
})
createWindow()

// ...
})

render.js

1
2
3
4
5
6
7
8
9
10
if (window.bridge) {
console.log('versions: ', window.bridge.versions)

const func = async () => {
const response = await window.bridge.invoke('webLoaded', { data: 'render success!' })
console.log(response) // prints out { data: 'success' }
}

func()
}

2.6 “原生” API / UI 调用

以 Notification 为例,参考 https://www.electronjs.org/docs/latest/tutorial/notifications

1
2
3
4
5
6
7
8
9
10
11
12
13
14
15
16
17
const { app, BrowserWindow, ipcMain, Notification } = require('electron')
const path = require('path')

function showNotification ({ title, body }) {
new Notification({ title, body }).show()
}

app.whenReady().then(() => {
ipcMain.handle('webLoaded', (event, args) => {
showNotification({ // 消息弹窗
title: 'webLoaded',
body: args.data
})
return { data: 'success' }
})
createWindow()
});

2.7 本地 DB 能力-sqlite

让 Electron 项目具备 sqlite 能力,实际上就是为 Node.js 项目添加 sqlite 能力。

https://www.npmjs.com/package/sqlite3

1
npm install sqlite sqlite3
1
2
3
4
5
6
7
8
9
10
11
12
13
14
15
16
17
18
19
20
21
22
23
24
25
26
27
28
29
30
31
const { app } = require('electron')
const path = require('path')
const sqlite3 = require('sqlite3').verbose()
const { open } = require('sqlite')

let db = null
async function dbConn () {
if (db) {
return db
}
// 软件缓存/db地址
// mac:/Users/xxx/Library/Application Support/xxx
const appData = path.join(app.getPath('userData')) // Electron 应用安装目录
console.log('appData: ', appData)
const sqlFile = path.join(appData, 'test.db')
// eslint-disable-next-line no-new
new sqlite3.Database(sqlFile)
db = await open({
filename: sqlFile,
driver: sqlite3.Database
})
try {
const res = await db.get('SELECT * FROM "demo_table"')
console.log('res: ', res)
} catch (e) {
await db.exec('CREATE TABLE demo_table (hello VARCHAR)')
}
return db
}

module.exports = dbConn

2.8 日志管理

https://www.npmjs.com/package/electron-log

1
npm install electron-log
1
2
3
4
5
6
7
8
9
10
11
12
13
14
15
16
17
18
19
20
21
22
23
24
25
26
27
28
29
30
31
32
33
34
35
36
37
38
39
40
41
42
43
44
45
46
47
48
49
50
51
52
53
54
55
56
57
58
59
const { app } = require('electron')
const path = require('path')
const log = require('electron-log')
const fs = require('fs')
const { format, subDays } = require('date-fns')

// 遍历文件夹下的文件
function listFile (dir) {
try {
const list = []
const arr = fs.readdirSync(dir)
arr.forEach((item) => {
const fullpath = path.join(dir, item)
const stats = fs.statSync(fullpath)
if (stats.isDirectory()) {
// ...
} else {
list.push(fullpath)
}
})
return list
} catch (e) {
log.error('[list-file] err', e)
return []
}
}

function logConfig () {
const logPath = path.join(app.getPath('userData')) // 将日志文件放在用户数据目录下
log.transports.file.maxSize = 1024 * 1024 * 100
log.transports.file.resolvePath = () => `${logPath}/${format(new Date(), 'yyyy-MM-dd')}.log`

// 为相关日志打印方法增加时间标识
const logInfo = log.info
const logError = log.error
log.info = (...rest) => {
global.logInfo += `\n${new Date().toLocaleString()}_${JSON.stringify(rest)}`
logInfo(...rest)
}
log.error = (...rest) => {
global.logInfo += `\n${new Date().toLocaleString()}_${JSON.stringify(rest)}`
logError(...rest)
}

// 删除3天前的日志文件
const list = listFile(logPath)
for (let i = 0; i < list.length; i++) {
const file = list[i]
const fileName = file.split(logPath)[1].substring(1)
if (fileName.length === 14 &&
fileName.endsWith('.log') &&
subDays(new Date(), 3) > new Date(fileName.split('.log')[0])) {
console.log('remove history log file: ', fileName)
fs.unlink(file, () => { })
}
}
}

module.exports = logConfig

2.9 应用打包

Electron 核心包里没有提供应用打包方案,需要使用其他方案完成打包。打包可以打出类似 windows 的安装程序,也可以打出类似 mac .app 的便携包。Electron Forge 是一款一体化(all-in-one)工具,用于打包和发布 Electron 应用程序。

https://www.electronforge.io/

1
2
npm install --save-dev @electron-forge/cli
npx electron-forge import # 转换当前项目

执行完上述命令,会自动添加 package.json 中 scripts、forge.config.js 以及相关依赖,大多用于不同平台打包使用。

  • npm run make
  • npm run package

这两个命令都可以完成打包,区别参考:differentiate between make and package in Electron Forge

2.10 应用发布与版本更新

https://www.electronjs.org/docs/latest/tutorial/tutorial-publishing-updating

尚未实践

3. 问题记录&说明

除代码中注释说明内容外,过程中可能会遇到本章节提到的各类问题。

3.1 preload 注入的安全问题

1
2
3
4
5
6
7
8
Electron Security Warning (Insecure Content-Security-Policy) This renderer process has either no Content Security
Policy set or a policy with "unsafe-eval" enabled. This exposes users of
this app to unnecessary security risks.

For more information and help, consult
https://electronjs.org/docs/tutorial/security.
This warning will not show up
once the app is packaged.

web 控制台上述报错,通过访问链接,在 Security 章节可以得到”最佳实践-安全“的答案。

先简单看看这里都讲了哪些内容:

前端在浏览器下运行,被”沙盒“限制了足够的权限,往往前端代码并不会带来相关的严重安全问题。但 Electron 本质上是客户端应用,我们使用 JavaScript 能够做更大权限的事情,包括不限于 文件系统操作、shell 操作等等,与之而来的安全问题不得不重视。Electron 本身不会为此”负责“,需要开发者自己明确所引用的资源安全(规避具有 Node 能力能够”摧残“操作系统的危险)。

安全是 Electron、Chromium、Nodejs、依赖的 npm 第三方包等共同作用结果,所以为了安全需要遵循一些最佳实践:

  1. Electron 版本:保持版本更新
  2. 评估第三方依赖的安全性
  3. 编码安全,避免常见的安全问题,如XSS

隔离不受信任的内容,比如加载远程站点,确保站点受信安全。

安全检查清单:

… // https://www.electronjs.org/docs/latest/tutorial/security#checklist-security-recommendations

回到问题本身,要解决这个问题,需要:

  1. 不使用内联 Script
  2. 增加 CSP 标签
1
2
3
<!-- https://developer.mozilla.org/en-US/docs/Web/HTTP/CSP -->
<meta http-equiv="Content-Security-Policy" content="default-src 'self'; script-src 'self'">
<script src="render.js"></script>

4. 常见场景配置

4.1 mac 顶栏设置

图像处理:https://www.electronjs.org/docs/latest/api/native-image

任务栏/托盘:https://www.electronjs.org/docs/latest/tutorial/tray

1
2
3
4
5
const icon = nativeImage.createFromPath('public/icon.png')

const tray = new Tray(icon.resize({ width: 16, height: 16 }))
tray.setToolTip('Hi, I am a tray icon.')
tray.setTitle('Electron App')

4.2 mac dock 应用图标

https://www.electronjs.org/docs/latest/api/app#appdock-macos-readonly

https://www.electronjs.org/docs/latest/api/dock

1
2
3
if (process.platform === 'darwin') {
app.dock.setIcon(icon.resize({ width: 32, height: 32 }))
}

4.3 设置应用程序图标

这里是指设置打包生成的应用程序图标,以 mac 为例。

  1. 首先准备要作为应用程序图标的图片,假设名字为 pic.png

  2. mkdir tmp.iconset,创建一个临时目录存放后续生成的图片

  3. 执行命令生成各个尺寸图片

    1
    2
    3
    4
    5
    6
    7
    8
    9
    10
    sips -z 16 16     pic.png --out tmp.iconset/icon_16x16.png
    sips -z 32 32 pic.png --out tmp.iconset/icon_16x16@2x.png
    sips -z 32 32 pic.png --out tmp.iconset/icon_32x32.png
    sips -z 64 64 pic.png --out tmp.iconset/icon_32x32@2x.png
    sips -z 128 128 pic.png --out tmp.iconset/icon_128x128.png
    sips -z 256 256 pic.png --out tmp.iconset/icon_128x128@2x.png
    sips -z 256 256 pic.png --out tmp.iconset/icon_256x256.png
    sips -z 512 512 pic.png --out tmp.iconset/icon_256x256@2x.png
    sips -z 512 512 pic.png --out tmp.iconset/icon_512x512.png
    sips -z 1024 1024 pic.png --out tmp.iconset/icon_512x512@2x.png
  4. npm i -g iconutil

  5. 通过iconutil生成icns文件 iconutil -c icns tmp.iconset -o Icon.icns

  6. 设置 forge.config.js

    1
    2
    3
    4
    5
    6
    packagerConfig: {
    asar: true,
    overwrite: true,
    name: 'ElectronApp', // 应用名
    icon: 'public/Icon' // no file extension required (mac is .icns)
    },